Of all the modifications in the modern custom mechanical keyboard hobby, none is more accessible, controversial, or effective as the Tape Mod (also known as the Tempest Mod).
It involves a procedure that seems fundamentally “wrong”: applying layers of painter’s tape directly onto the back of your keyboard’s sensitive Printed Circuit Board (PCB).
Despite its humble, low-tech origins, the Tape Mod has become a foundational technique for tuning keyboard acoustics, promising to convert hollow “clack” into a deep, muted “thock.”
After testing this mod on over 40 different configurations, ranging from budget plastic kits to high-end aluminum boards, I can confidently state that while the Tape Mod is extraordinarily effective, it is not magic.
Understanding why it works from an acoustic perspective, utilizing safe materials, and respecting the flashing procedure detailed in image_26.png are critical for achieving the desired sound profile without risking electronic failure.
This guide provides the definitive technical analysis of the Tape Mod, detailing safe application, material risks, and comparative sound tuning.
Read Also: How to Program Your Keyboard Layout Using VIA and QMK
The Acoustic Science: How Tape Affects Sound Resonance
To understand why tape works, we must understand how a keyboard functions as an acoustic chamber. When a switch bottoms out, it generates high-frequency vibrations. These vibrations travel through the switch housing, the plate, and finally, into the empty cavity of the keyboard case.
The common, high-pitched “clack” is the result of these high-frequency sound waves reflecting and bouncing off hard surfaces—specifically, the PCB and the internal case walls.
Applying layers of tape (as seen in image_28.png) directly to the back of the PCB changes this acoustic environment in three critical ways:
- Mass Loading (Dampening): The tape adds mass directly to the PCB. A denser surface vibrates at a lower frequency. This immediately acts as a filter, shifting the resonance away from high-pitched clack.
- Sound Absorption: The soft, textured surface of the painter’s tape does not reflect high-frequency sound waves efficiently. Instead, it absorbs them.
- Barrier Formation: The continuous layer of tape acts as a subtle acoustic barrier, preventing high-frequency sounds that do reflect off the PCB from reaching the larger case cavity, where they would normally resonate and amplify (a phenomenon known as hollow ring).
Safe Materials vs. Critical Risks
- The Only Safe Option: High-Quality Painter’s Tape (Masking Tape): Use 3M Scotch or a similar high-quality, creped-paper painter’s tape (often blue, as shown in image_29.png).
- Why: Painter’s tape uses a specifically low-tack, semi-permanent adhesive that is designed to be removed cleanly without leaving residue. More importantly, it is non-conductive.
- NEVER USE: Duct Tape, Electrical Tape, or Gorilla Tape: These tapes utilize extremely aggressive, solvent-based adhesives.
- The Risk: They are conductive and will physically bond to the tiny surface-mount components on the PCB (like the golden points in image_26.png). If you ever try to remove aggressive tape, you will tear the components off the board, permanently destroying the PCB.
Step-by-Step: The Safe Tape Mod Procedure
Expert Warning: Before applying the tape, ensure your keyboard’s firmware has been correctly flashed. Once the PCB is covered in tape, shorting the bootloader pads becomes exponentially more difficult.
- Preparation: Power down and unplug your keyboard. Open the case. Carefully remove the primary internal assembly (Plate, Switches, and PCB) from the bottom case, ensuring you do not strain any JST connector cables (common in boards like image_6.png).
- Organization: Lay the assembly face-down on a clean, non-conductive surface (like the grey mat in image_1.png).
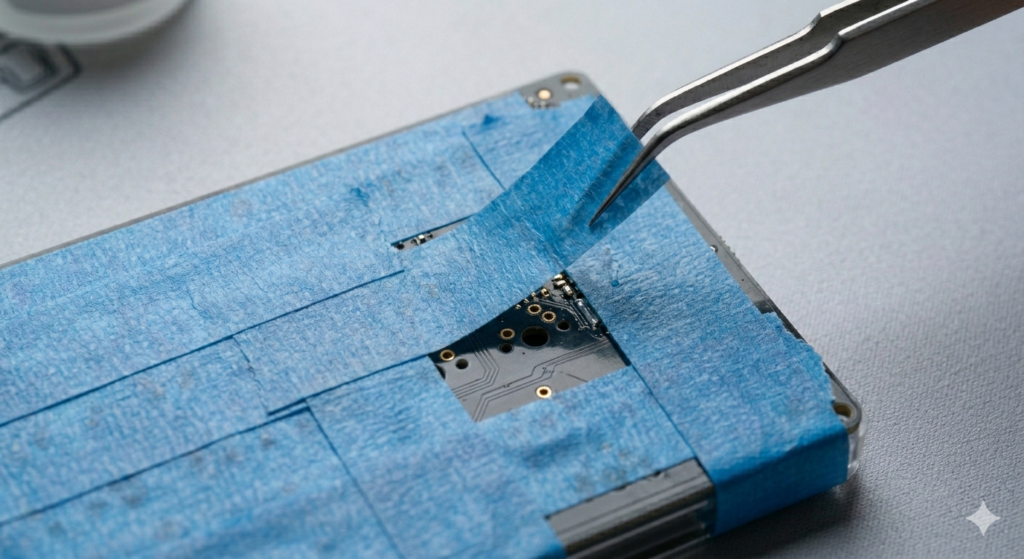
- Application (Layers 1 and 2): Use wide painter’s tape. Measure a strip that covers the width of the PCB. Using precise tweezers (like in image_29.png), align the first strip. Start applying the tape near the spacebar area, as this is often the most resonant section.
- Technique: Lay the strips down smoothly, minimizing air bubbles. Slightly overlap the strips. Do not pull the tape excessively tight.
- Application (Layer 3+): Apply a second and, optionally, a third layer. We have found that the acoustic return (the deepening effect) significantly diminishes after three layers. A fourth layer rarely improves the sound but can complicate reassembly (see “Fitment Issues”).
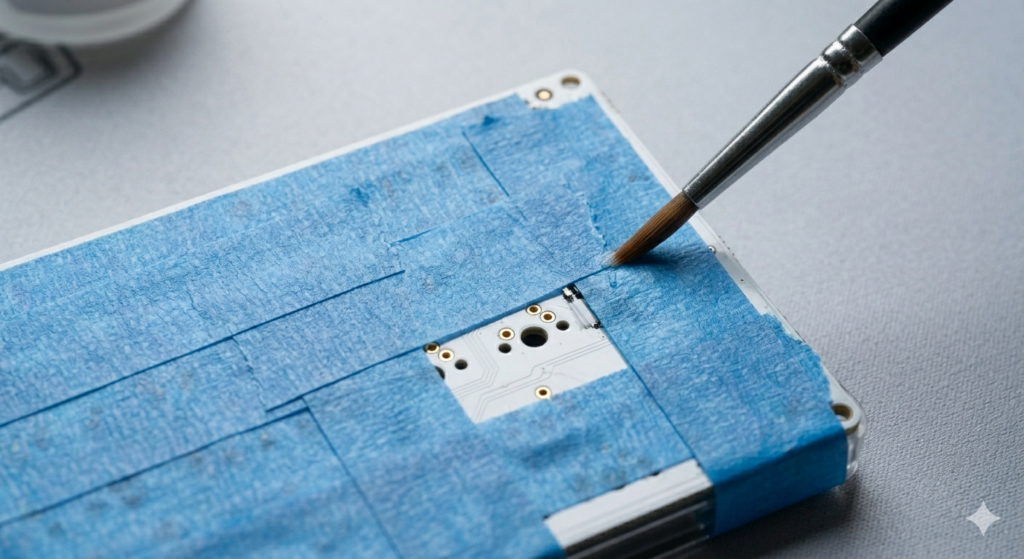
- Finishing: Use a precision brush (similar to image_0.png) or your finger to firmly press the tape around the golden hot-swap sockets (like image_26.png). This ensures the tape is physically bonded to the board and acting as a uniform dampener.
Comparative Analysis: Thock vs. Clack
The effectiveness of the Tape Mod is often context-dependent, specifically relating to the keyboard case material.
- Plastic/ABS Cases (e.g., image_20.png): The Tape Mod is transformative. Plastic cases are naturally hollow. The mod eliminates this hollowness, shifting the sound profile directly into the muted, “thocky” range. This is the #1 mod for budget keyboard kits.
- Aluminum Cases (e.g., higher-end image_6.png configurations): The effect is subtler. Aluminum is denser and resonates differently. Tape will still deepen the pitch, but its primary benefit in metal boards is often to reduce high-frequency “ping” and acoustic harshness.
Read Also: Why Material Choice Changes Your Typing Sound”?
Troubleshooting and Maintenance
- Mushy Feel: Over-lubed switches or poor fitment (mushy spacebar).
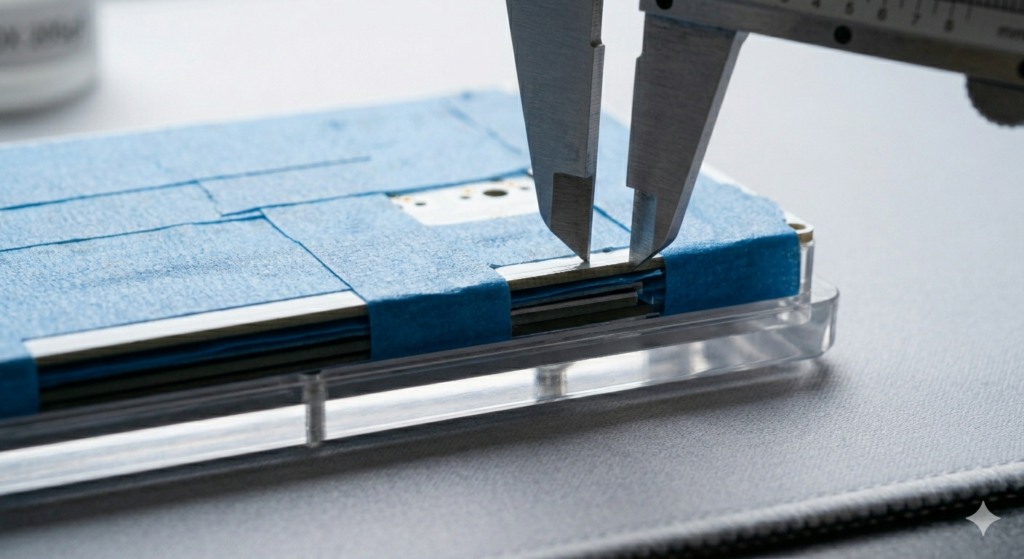
- Fitment Issues (Stack Height): A critical consideration. Adding three layers of tape adds ~0.3mm to the assembly’s thickness (visualized by the caliper measurement in image_30.png). In tight case designs, this can prevent the assembly from sitting flat or cause the assembly to touch the bottom of the case, which negates the dampening effect.
- ESD (Static Shock) Myth: While rare, there is a theoretical risk that peeling certain non-paper tapes very quickly could generate a small electrostatic discharge. Paper painter’s tape minimizes this risk, making it the safest option.
Conclusion
The Tape Mod ( Tempest Mod) is not snake oil; it is a foundational acoustic tuning technique based on the simple principles of mass loading and sound absorption.
By utilizing safe, non-conductive, low-residue painter’s tape and adhering to the flashing warnings detailed in image_26.png, you can physically alter the resonance profile of your keyboard.
The mod effectively filters harsh, high-frequency reflections (clack) and amplifies the satisfying, deep acoustics (thock) that builders crave. For budget plastic keyboards (like image_20.png), it is the single most efficient way to achieve a premium sound profile.
For metal boards, it serves as a refined tool for acoustic dampening. Respect the materials, execute the application cleanly (as shown in image_29.png), and listen to the transformation.