You have carefully selected your linear switches and spent hours lubing them to perfection. You assemble your keyboard, eager to type, and then you press the Spacebar, Enter, or Shift keys.
Rattle, tick, tick. That hollow, plastic-on-metal noise is enough to ruin even the highest-end custom keyboard build.
After years of troubleshooting dozens of boards, I have learned that stock stabilizers are rarely perfect. The core problem is that the metal wire has too much room to “balance” and strike the inside of the stabilizer stem.
This comprehensive guide details the exact process I use to eliminate rattle, focusing on the highly effective “Holee Mod” and essential lubrication techniques.
Identifying the Source of the Rattle
Before you begin modding, you must understand exactly where the noise is originating. In my experience, 95% of stabilizer rattle comes from two places:
- The Wire Balancing Point: Where the 90-degree bend of the metal wire sits inside the plastic stabilizer stem.
- Housing Wobble: The entire plastic stabilizer assembly is loose in the keyboard plate.
This guide tackles both. While there is a debate in the community about “clipping” vs. non-clipping stabilizers, modern stabilizers (like PCB-mount Durck V2s or Plate-mount Cherry stabs) generally do not require clipping. The modern focus is on superior dampening and consistent lubrication.
Read Also: How to Lube Mechanical Switches
The Stabilizer Modding Kit: What You Need
Do not attempt these mods with generic lubricants or tools. Consistency is everything when tuning stabilizers.
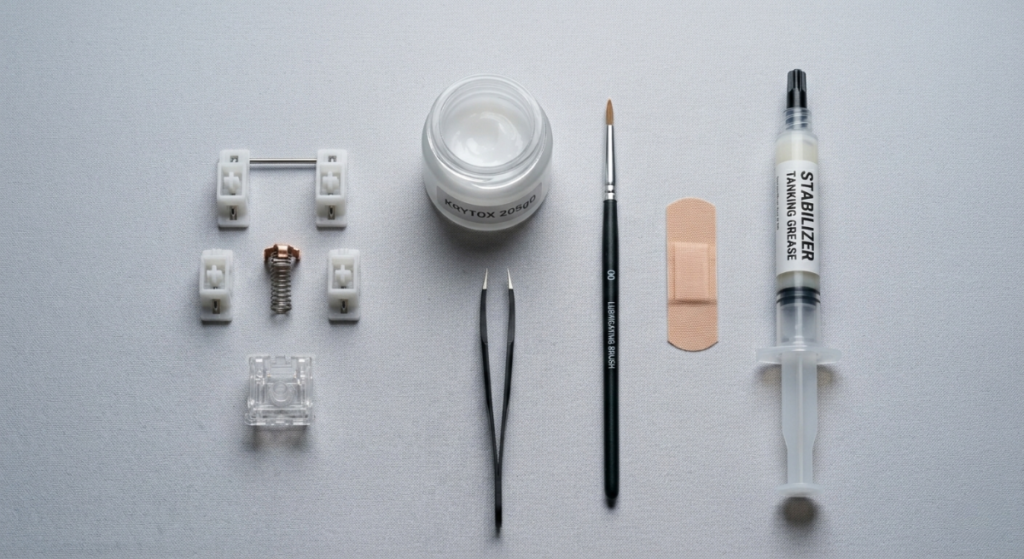
- 1. Thicker Lubricant (e.g., Krytox GPL 205g0): For the stabilizer housings and stems. You need a thicker grease to provide dampening.
- 2. Very Thick Tanking Grease (e.g., Dielectric Grease or Permatex): Crucial Note: Do not use Krytox 205g0 on the metal wire itself. You need a highly viscous, sticky grease (like Dielectric grease) specifically for where the wire inserts into the stem. This “tanks” the wire and physically prevents it from hitting the walls of the stem.
- 3. Applicator Syringe (or precision syringe): Required for injectiing the thick grease.
- 4. High-Precision Tweezers: Essential for the “Holee Mod.”
- 5. Fabric Bandage (Band-Aid) or Leukoplast Tape: The secret weapon of the modding community. We will use tiny strips of the fabric part to dampen internal impact.
Step 1: Solving Housing Wobble (The Plate-Mount Fix)
If you are using plate-mount stabilizers (very common in budget/mid-range hot-swap boards), the housing often wobbles inside the metal plate cutout.
- Diagnosis: Remove the spacebar. Gently push on the black or white plastic stabilizer housing. Does it shift or rock back and forth? If yes, this creates a ticking noise.
- The Fix (Plate-Mount Only): Cut a tiny square of the sticky adhesive part of a fabric Band-Aid (do not use the padded part). Place this adhesive square onto the edge of the keyboard plate cutout where the stabilizer clip engages. When you reinstall the stabilizer, it will press down onto the fabric, creating a tight, silent seal.
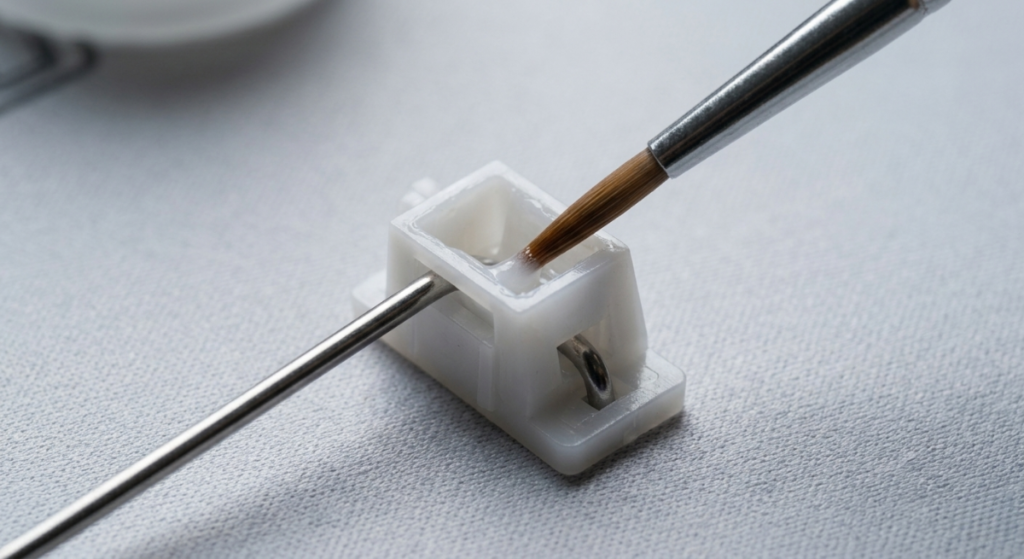
Step 2: The Core Fix—The Wire “Tanking” Technique
This is the single most effective way to kill rattle. We are going to use a medical syringe (filled with thick Dielectric Grease) to completely pack the well where the wire rests. This creates a cushion that prevents the wire from striking the plastic stem housing.
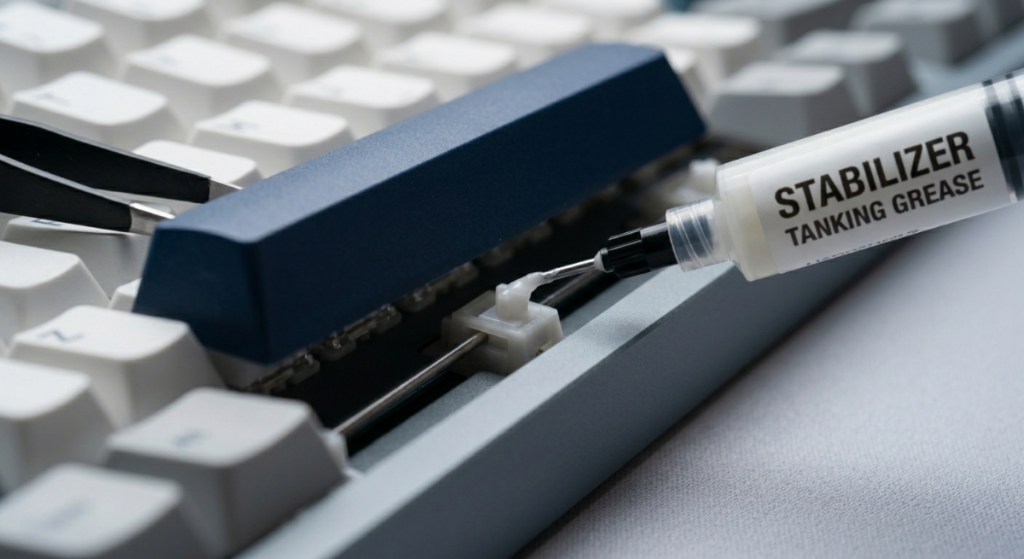
- Preparation: Fill your syringe with Dielectric Grease. If your stabilizers are already installed (hot-swap board), this can be done without desoldering. Lift one side of the spacebar slightly to expose the stabilizer stem.
- Injection: Carefully insert the syringe tip into the side opening where the wire enters the stem. Squeeze the syringe gently. You want to fill the internal cavity. Stop when you see a tiny amount of grease begin to exit the top of the well. Repeat on the other side.
- QC: Reinstall the spacebar and press it. It should feel significantly heavier and sound muted. If it still ticks, you haven’t used enough grease. If it feels sluggish or “mushy,” you have used too much.
The Advanced Solution: The Holee Mod (Step-by-Step)
If syringe-lubing the wires didn’t work, you must execute the “Holee Mod.” This mod involves lining the internal ramp of the stabilizer stem with a tiny strip of dampening fabric.
It is tedious, but for problematic stabilizers, it is the ultimate fix. Warning: Do not apply this mod to stock stabilizers without first trying the syringe-lube method.
- Cut the Dampener: Cut a minuscule strip of fabric Band-Aid. It must be about 2mm wide and 5mm long. This is why you need high-precision tweezers.
- Apply to the Stem: Lightly grease the top and bottom internal “ramps” of the stabilizer stem.
- Install the Mod: Using tweezers, carefully guide the tiny fabric strip down into the stem. Adhere it to the grease-covered ramp. The goal is to create a soft landing pad for the stabilizer wire when it descends. This mod requires extreme precision, as the fabric cannot interfere with the external travel of the stem.
Read Also: The Ultimate Guide to Keyboard Mounting Styles
Conclusion
Rattly stabilizers are not a curse; they are simply a symptom of an incomplete custom keyboard setup. While fixing a Spacebar rattle can be frustrating, the techniques detailed above provide a roadmap to success.
Start with proper housing dampening, and then use the syringe-lubing method to “tank” your wires. Only move to the advanced Holee Mod if the standard lubrication fails. With persistence and the right materials, you can finally achieve the silent, premium typing experience you deserve.

Vipul is a digital entrepreneur with a deep specialization in hardware optimization and web ecosystem management. With years of experience in the SEO industry and a passion for mechanical keyboard architecture, Vipul personally researches, tests, and writes every guide found on this site.